Touchprints
How to Preserve Your Baby’s Handprint on a Basketball (Step-by-Step)
Share
A newborn’s hand is smaller than you expect. Even when you’re holding one, you can’t quite believe it. A regulation NBA basketball is 9.4 inches in diameter. Your baby’s hand, palm out flat, covers maybe three inches of that. The ratio is almost cartoonish.
And then it changes. Fast.
That window, the one where their hand is small enough to look genuinely tiny against a basketball, lasts maybe a year. Maybe less. And if you don’t capture it, you don’t get it back. That’s just the deal.
That’s what this is about.
Why a Basketball Specifically
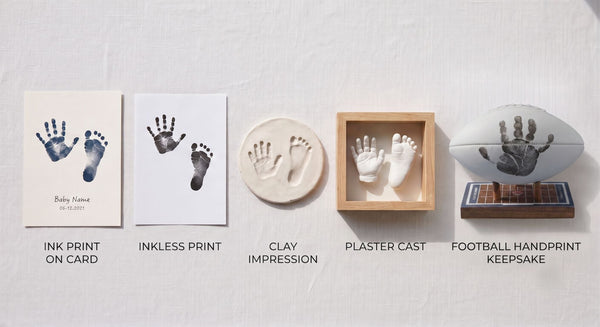
You could put a handprint on a lot of things. Paper. Canvas. A ceramic tile that gets framed and stored. Those are fine options. We’re not here to tell you what to do.
But a basketball is different. It has weight. It has presence. It lives on a shelf instead of in a drawer. It's the kind of keepsake that works as a baby shower gift, a first Father's Day gift, or just a thing you make together on a Saturday. It starts conversations. When your kid is 14 and can palm that same ball in one hand, they’ll see their three-inch handprint from 2025 and feel the difference in a way that a framed piece of cardstock doesn’t quite deliver.
That’s not a scrapbook feeling. It’s something else.
(This same logic applies to footballs and baseballs, by the way. Same idea, same process, different ball. But the basketball is where we started, so that’s where we’ll start.)
The DIY Problem
Here’s the honest version of this story: before we figured out a reliable process, we tried everything. Stamp pads from the craft store. Fabric paint. Acrylic. Every combination we could find online.
The problems showed up consistently.
Ink bleeds on the textured surface of a basketball. Paint smears before it sets. The oils in composite leather repel water-based products in ways you won’t discover until the handprint is already ruined. And then you’ve got one shot, a baby with opinions about having their hand held still, and a ball that now has a faint smudge where the print was supposed to be.
It took a year of testing to get a process that actually works. That’s not a line. It’s just what it took.
What Actually Works: Step by Step
The process breaks into four stages. Do each one and you get a clean, lasting print.
Step 1: Prep the ball.
The surface needs to be free of oils and handling residue, not just visually clean. An alcohol prep wipe, the same kind used in medical settings, cuts through all of that. Let it dry completely before moving on.
Step 2: Clean the hand.
Same idea. No lotion, no residue. This step gets skipped most often, and it’s usually why DIY attempts come out muddy or faint.
Step 3: Apply the ink.
Use a child-safe, non-toxic ink pad and apply it evenly across the full palm. Press the hand flat against the ball with consistent, gentle pressure. Hold it still for a few seconds. Lift straight up. Don’t drag.
That last part matters more than it sounds. Dragging is how prints smear.
Step 4: Seal it.
A brush-on sealant, applied like nail polish, locks the print and protects it from handling over time. Two light coats, letting each one dry before applying the next. This is what makes it permanent instead of something that fades over a few months.
Total time from start to finish: about 15 minutes. Assuming a cooperative baby (Results may vary on the cooperative part). See our FAQ for more information.
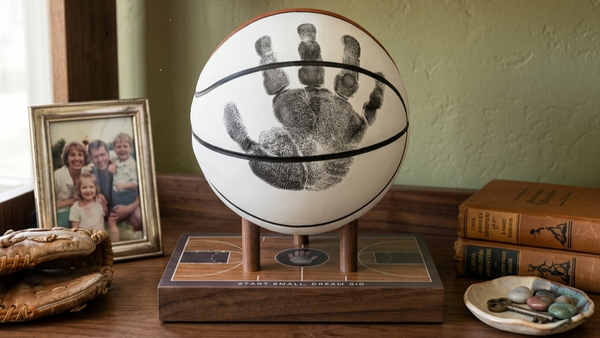
The Display Question
The print is only half of it. What you do with the ball after determines whether it becomes a keepsake or just a ball with a handprint on it.
A basketball sitting on the floor reads as a basketball. A basketball on a display base reads as something intentional. Something that belongs. The base is what takes it from “that’s cool” to “okay, that’s actually really special.”
The display base should hold the ball at an angle that keeps the handprint facing out. Clean and stable, nothing competing with the ball itself. That’s it. Both our walnut and maple kits include a real wood display base.
When Should You Do This?
The question we hear most: when is the right time?
There are two windows that work really well, for different reasons.
There is no wrong time to do this! We've done these with our kids every stage along the way. There are some windows that are easier than others.
The first is newborn to around six months. Babies in that range are cooperative in the best possible way, meaning they can’t run away yet. The hands are impossibly small, the size contrast against the ball is dramatic, and the whole process is easier than you’d expect. If you’re in this window right now, it’s a great time to do it.
The second window opens around 18 months and never really closes. A toddler’s handprint tells a different story than a newborn’s. So does a five-year-old’s, or a ten-year-old’s. The ball becomes a timeline if you let it, or just an honest record of where they were at one specific moment. Both are worth having.
The stretch between six and eighteen months is trickier mostly because babies in that range have opinions and motor skills and zero patience for having their hand held still. Totally doable, just a little more of an adventure! That's why we made our basketballs with the ability to wipe the ink off with some rubbing alcohol so if they do squirm and smear the ink you can wipe off the ink and try again.
Quick Answers
Can you put a newborn's handprint on a basketball?
Yes! Newborn to about 6 months is actually one of the best windows. Their grasp reflex makes this a two person job, but its very doable. Here's more about the timing.
What kind of ink is safe for a baby's hand?
A child-safe, non-toxic ink pad — the kind made specifically for baby hand and footprints. We made sure to supply an ink that is child-safe. It wipes off skin with a regular baby wipe. Never use craft-store stamp ink or acrylic paint on a baby's skin.
Will the handprint fade or rub off the basketball?
Not if it's sealed. Two light coats of a brush-on sealant lock the print permanently. Unsealed ink on composite leather fades with handling within months — sealing is the difference between a keepsake and a temporary print.
How long does the whole process take?
About 15 minutes, start to finish, assuming a cooperative baby. (Results may vary on the cooperative part.)
Does this work on a football too?
Same process, same materials, different ball. Our football kits work identically — prep, ink, seal, display.
One More Thing
The first time we got a clean print on a basketball, we just looked at it for a while. It looked right. It looked like something that was going to last.
That’s the whole point of this. Something small enough to fit on our basketball. Big enough to keep forever.
Little Touchprints makes handprint keepsake kits for sports balls perfect for newborn through big kid. Offer kits including basketballs and footballs. Every kit includes a child-safe ink pad, alcohol prep wipe, brush-on protective sealant, and a display base. Everything you need, nothing you don’t.

Dakota Thompson
Co-Founder, Little Touchprints
Dakota spent more than a year developing the kit with co-founder Quentin Holtz after he could not find a way to put his daughter's handprint on a basketball. He still assembles kits by hand in Austin, Texas.
Preserve this season before the next one starts.
Shop the kits